


I got all of my corn frozen last night and wanted to get this post up in case anyone else wants to do corn right now! It’s really easy, just a little messy/sticky!
What you will need:
Corn – husked and the silk taken off
A large pot (or two, I used my qt pot and my canner to make things go faster)
Several large bowls – I used my cooler for the ice water, a towel-lined laundry basket, and then my large popcorn bowl for the finished corn
Electric knife or just a good sharp serrated one
Angel food or bunt cake pan
Tongs
Ziploc Freezer bags

Step 1: Get your pot filled with water and start it boiling on high heat. This can take a while, so I do it first.

Step 2: Get everything else ready. Bowls, knives, etc. Fill your cooler or a large bowl with ice water. You will need to replace the ice as it melts, so make sure you have a lot on hand. I bought one bag from the store and could have easily had more, it barely made it through all my corn!

Step 3: Blanch corn. This destroys all of the enzymes that destroy nutrients in vegetables. Before freezing veggies you should blanch them to ensure they retain their nutritional value and taste their best. I blanched 6 ears at a time in each pot, for 4 minutes each. You can blanch for 4-6 minutes if you are going to freeze creamed corn or whole kernels. I didn’t want to risk over cooking it, so opted for 4 minutes and it was perfect. Your water should return to boiling within 1 minute of putting the corn into it. If it doesn’t, you are either using too many ears of corn at a time, or don’t have enough water. Adjust as necessary.
When the corn is finished blanching, take the tongs and put the corn into ice water. This stops the corn from cooking and keeps it right where you want it. Cool for as long as you blanched. For example, I blanched for 4 minutes, so I cooled it for 4 minutes as well!

You might need to replace some of your hot water as you go, so just keep an eye on it. You can blanch about 5 batches of corn using the same water. I didn’t need to replace mine at all, since I used two pots.
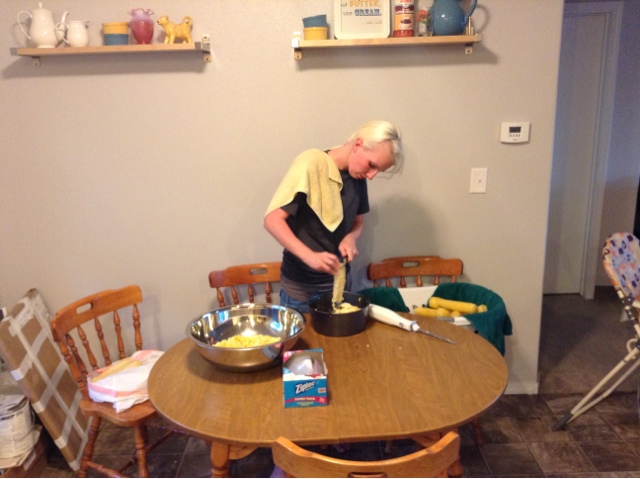
Step 4: When you’ve blanched all your corn, take one ear at a time and cut off the kernels. I use my angel food cake pan to hold each ear by placing the pointy end down into the hole in the pan. This way, all of the corn you cut off falls into the pan and it’s SO much easier to clean up. When the cake pan gets full I just dump it into a large bowl.

Step 5: Take your bags and fill with as much corn as you want. I used 2 c in each bag, because that seemed like a good portion for adding to soup, crock pot chicken, or just eating. Try to squeeze out as much air from each bag as you can. I close the bag most of the way then suck out the rest of the air with my mouth. Close and label your bags and throw them in the freezer!
That’s all there is to it! It’s pretty darn easy and makes you feel great to get all of that delicious summer corn in the freezer for the winter. I ended up husking and blanching 55 ears of corn, and ended up with 54 c for the freezer. Clean up isn’t that fun, but very worth it! This took me a couple of hours from start to finish all by myself.


Yay thanks for this post! I just need to find some good corn around here!
Our corn grew quite well so I'm going to freeze some of it. Thanks for the post!
Also – random thing – when I worked at the old folks home in Raymond in the kitchen they taught me to put a straw in a plastic bag to suck out the extra air.
Does that make sense? I do it when freezing pies, etc. and it takes out ALL the extra air.